Author: gec

  • Solution to The Trust Relationship Between This Workstation and Primary Domain Failed

    Happy Tech Tip Tuesday to you! In this week’s edition, I bring you a technical and ugly problem. When you try to log on to your computer, you receive the error message: “The Trust Relationship Between This Workstation and Primary Domain Failed.” Get your IT guy, because this one is going to require a little bit of tech savvy and a few passwords that not everybody in an organization is going to have. We won’t get in to the nitty gritty of why this happens, we’ll just get right down to how to fix it!

    The first thing we need to when we get the error “The Trust Relationship Between This Workstation and Primary Domain Failed” is to get logged back in to the machine. Preferably with the domain administrator’s credentials. Typically, in a simple network setup, the user’s name is Administrator and it’s the password used to log on to the domain controller, or your primary server.

    Don’t miss this step: What if that user still can’t get logged in? Simple! UNPLUG THE NETWORK CABLE from the computer. When it cannot detect a network connection, the computer will allow you to login with cached credentials, meaning it will accept the name and password that it remembers from the last time you logged on.

    Once you’re logged on as Administrator, you need to place the computer in to a workgroup, then RE-Join it to the domain. Here’s the blow by blow:

    1. On the keyboard Hold down the Windows Key and Press the Pause Key
    2. (or RIGHT CLICK the “Computer” or “My Computer” in your Start Menu and click “Properties”).

    3. In Windows XP, click the Computer Name tab – in Windows Vista/7, click Advanced System Settings on the left, then click the Computer Name tab.
    4. Click the Change button
    5. At the BOTTOM of the Window, first NOTE WHAT IT SAYS IN THE DOMAIN FIELD. WRITE THIS DOWN.
    6. Select the WORKGROUP radio button & enter a name (example: call it WORKGROUP temporarily)
    7. Click OK. You MAY be prompted to restart the computer. Decline at this time.
    8. If necessary, plug your network cable back in at this time.
    9. Click the CHANGE button again.
    10. Click the Domain radio button and enter the information you wrote from step 4
    11. Click OK and restart the computer as asked.

    Upon rebooting, you should be able to log back in to the computer as yourself! If you restarted during step 6, you will need to login using a username with Local Administrator Credentials. If you don’t know a password or username to use, you’ll have to reset them using a tool called NTPassword (looks fake, works great) (UPDATE: New Blog Post: how to use NTPassword), but I won’t get in to the specifics of that here. On some Windows XP machines, you may get lucky just trying the name Administrator with no password. Best of luck in the process, though. It generally isn’t too painful to get back online after “the trust relationship has been broken!”

  • Download Windows 8 Consumer Preview Wallpapers here

    If you’re interested in downloading the beta (betta) fish wallpaper, or any of the other high resolution nature photograph wallpapers that are seen in the Windows 8 Consumer Preview (Build 8250), look no further. They can all be downloaded in a single zip file hosted here: Windows8_8250_Wallpapers.zip

    Also, if you miss the good old days, you can still grab all of the wallpapers from the Windows 7 beta build 7100 released years ago in another zip file: Windows7_7100_Wallpapers.zip

    For the full blown experience, don’t forget to download the consumer preview and install it (may I suggest you do this on a ‘spare’ computer or a virtual machine)!

  • Download the Windows 8 Consumer Preview Beta now!

    When you first begin booting from the CD, an abstract version of the Windows 7 “BETA” (betta) fish image appears. You know you’re in for a treat. This is the Windows 8 “Consumer Preview” – or what most are calling “public beta.” You can download it from Microsoft, in an easy to use ISO format here:

    http://windows.microsoft.com/en-US/windows-8/iso

    On this page you can choose your language, decide if you need 32 or 64-bit, and get the product key which will be required to install.

    The installation is extremely straight forward and simple. At one point I was asked to login with my “Microsoft account.” This, for those who may not be certain, is any existing Windows Live ID. If you’re on Xbox Live, you’ve got a LiveID. When it asked for my phone number, I clicked next without providing one. This is a password recovery feature also provided on account.live.com.

    I installed to a VMWare image, so I could avoid any potential data loss or the need to move my data around at all. So in my virtualized Windows 8 environment, I immediately went for Xbox Live. I have no intentions of doing performance testing as my desktop is actually a few years old and doesn’t support hardware based virtualization. In other words it’s functional, but not very fast. Although I had a few programs close out on me when trying to get them to load, I’ve been able to play a little bit of Cut the Rope so far. Yes, it’s still fun, even with a mouse.

    I’ll have more to say tomorrow, but if you want to check it out, now’s the time! Get downloading and enjoy!

  • My Computer is Infected – how do I remove viruses?

    STOP RIGHT THERE!! Before you go any further, read this carefully. Since about 2008, there has a been an astronomical increase in the number of programs which look like antivirus programs (for example, Win 7 Internet Security 2012. Only when you click on them are you then infected. This article does have tips for removing those viruses, but I also include several pictures to increase awareness of these official-looking-but-entirely-bogus programs. If you know what to look for you, you may be able to safely back away without actually getting infected.

    This article was originally written in March of 2009, updated in February 2010, and is now being updated and re-published a third time on February 26th, 2012.

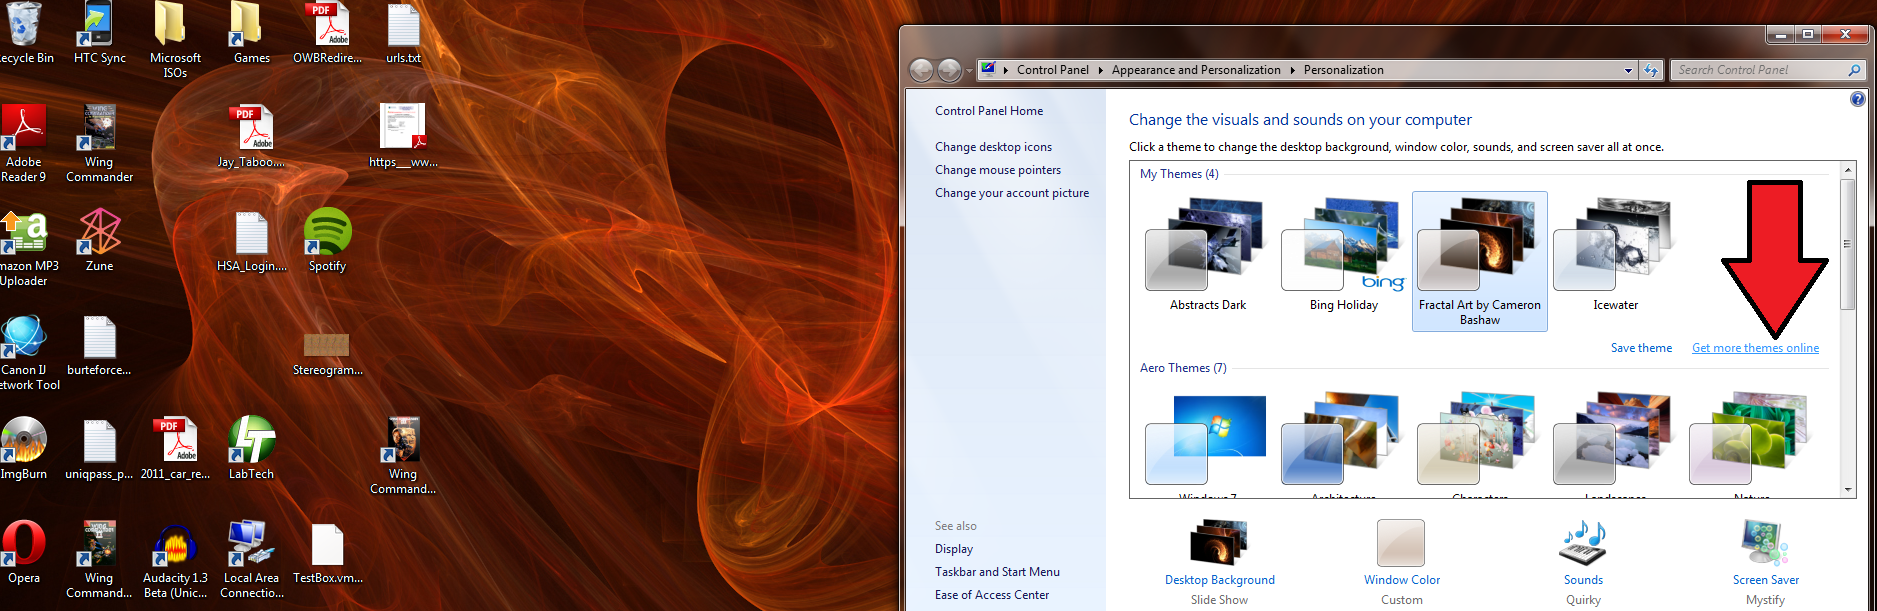
    2012 tips: my advice for you, this year, is this: DON’T CLICK ANYTHING. If you see a screen like the one above, don’t even try to close it. Immediately use the task bar at the bottom of the screen to switch back to anything you need and save it. Then, click the start menu, and SHUT DOWN THE COMPUTER. If you don’t click on the button to ‘stop the scan’ or ‘clean infected files’ or anything like that, you’ll be in good shape. At this point, it’s just an official looking popup window, but nothing’s actually been installed on your computer. But we’re going to play it safe.

    With the computer shut all the way down, boot in to “safe mode with networking.” To do this, locate the “F8” key on the top of your keyboard. See it? Hit the power button to turn on your computer and immediately start tapping F8, at least once a second. It should bring you to Windows Advanced Startup Options. There you can use the arrows on the keyboard to select Safe Mode with Networking. Then log in to Windows the way you normally would – safe mode will look a little different, but work with it, you should be safer in here. If the viruses pop up immediately, when in Safe Mode, you’re going to need more help than we can provide in this blog. If you’re in safe mode, keep reading.

    From here, we’re going to use two tools, both free. Open your web browser and go to SuperAntiSpyware.com and click on the link for Super Anti-Spyware Portable Version. Run a full system scan using that tool and remove anything it finds. Then, for best results, I would also advise downloading, installing, and running the free version of Malware Bytes Anti-Malware. Use the “download now” link on the website to obtain their free edition.

    Both prorams are somewhat complex but also self explanatory. Don’t let them overwhelm you. With Super Anti-Spyware you simply choose your languge, then click the “Scan Your Computer” button. Once both scans have completed (depending on the age of your computer, size of your drive, and number of files, the process can take nearly an hour per scan), and you have removed the reportedly infected files (both programs make it very simple to clean the files they have found to be malicious), reboot your computer. It will boot normally back in to Windows, and hopefully your issues are resolved.

    Good luck.

    Below are the original two revisions of this article and some additional screenshots.

    This is a rewrite of a bulletin I put out in March of 2009. I still find this to be a common issue which I feel needs addressing.

    Recently, a slew of my friends, family, co-workers, and just people on the street, have come to me with the same question: “I think I have a ton of viruses, how do I fix it?” The simple fact is: you probably don’t have a ton of viruses!

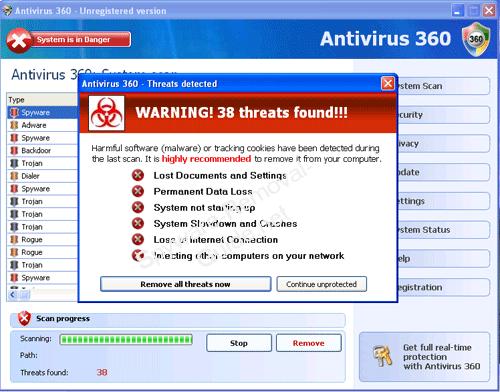
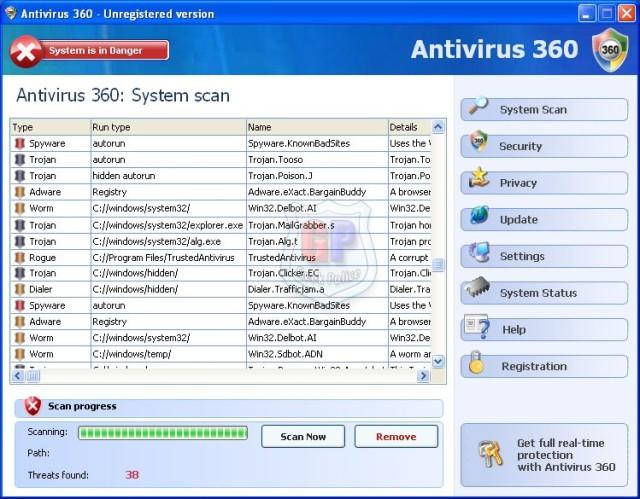
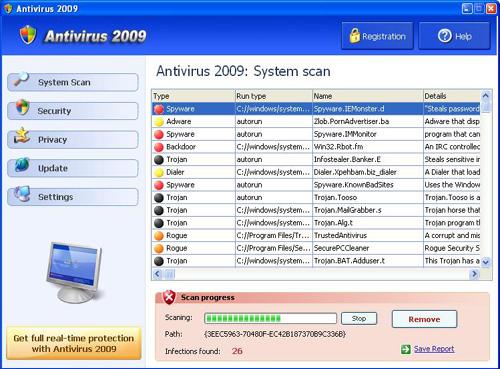
    Antivirus 2009/2010 (looks like Windows Security Center) and Antivirus 360 (looks like Ad-Aware) are new POP UP PROGRAMS, usually contracted while surfing the internet – even on legitimate websites. This anti-virus lookalike program will pop up with the sole purpose of making you panic, telling you that you need to click to fix the problem NOW. If you then click the “REMOVE ALL THREATS” or “FIX THIS NOW.” If you’re lucky, at this point, it will ask you to BUY their “special” virus and “mal-ware” removal program.

    If you’re unlucky, it will actually start to install a virus on your computer. It LOOKS like it is there to help, warning you have several viruses, but when you click on the banner to “fix this problem” you are actually installing the very bad payload, which is, itself, a virus. The virus then disables your ACTUAL anti-virus program (if you have one); it blocks the ability for your antivirus program to retrieve updates capable of fixing this problem. All in all puts you in a very deep hole of problems.

    What you need to know: If you did not tell the computer to do a virus scan, and suddenly it pops up and says you have dozens or even hundreds of viruses, it is one of these FAKE pop ups! No doubt in my mind. Most Virus Scanners can find one or two viruses when they’re running their automatic scans in the background. If you did not start a manual Full System Scan, your computer will never tell you that you have 300+ viruses – it can’t find that many without doing a manual scan. So if something ranomly tells you that you’re sunk, don’t panic, take a deep breath and laugh it off: you already know their tricks!

    If one of these pops up on your computer: your safest practice is to immediately save anything you are working on, and restart your computer. Do not try to close the window that is alerting you of all of the viruses; shutting down the computer will close the pop up. If it does happen to be a legitimate problem or something is actually installed on your computer, and it will pop back up next time you turn on the computer. If it does not come up after a restart – it was likely nothing more than one of these fake pop ups, and nothing has been installed on your computer!

    I personally dealt with one of these pop ups, recently, where even when you clicked the “X” in the top right, to close the program, it refused to exit. It would say “are you sure you want to close” then as soon as you clicked “YES” – another window popped up with the same “virus alert!” It is trying to trick you in to clicking the wrong thing, thus installing the “payload” which could do anything from causing the computer to go slow by infecting other computers, to stealing files off of the computer, to even crashing the whole thing, requiring a complete rebuild. That is why I recommend immediately shutting down and/or restarting the computer.

    If you have accidentally “installed” one of these “antivirus” programs, in an attempt to solve the problem it created, you might not be entirely out of luck, as the website MalwareBytes.org has an anti-malware “removal tool.” At this time, it is the only recommended removal software I have come accross, earning recognition from several “tech” websites as the best possible solution to those who may have clicked on a fake anti-virus banner, next to wiping the computer clean and rebuilding it.

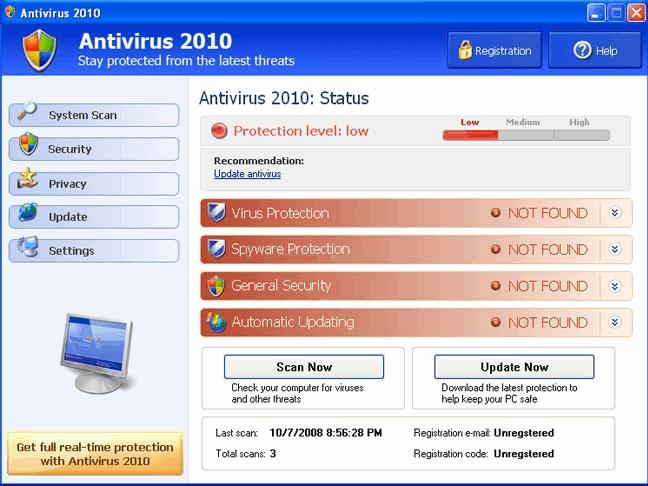
    Above, I have included a few “screen shots” of what these fake antivirus programs might look like, these are only a few variants, there are literally dozens popping up (no pun intended) right now.

    Thanks for reading, I hope it was more “edu-taining” than jargon heavy gibberish!

    If you’re really interested in the technology part, check the ISC’s article.

  • Set Office 365 Passwords to Never Expire

    In BPOS, users would at least get a warning when they logged in. In Office 365, we’re seeing passwords expire and nobody knows why their Outlook or Lync suddenly stopped working. You can always have someone go to Portal.Microsoftonline.com and reset their password – it’s rather simple. But even less of a headache? Make it so that their passwords don’t expire. Follow the step by step below:

    Download & install the cmdlet programs (you may
    already have these and be using them).

    • Microsoft Online Services Sign-In Assistant (IDCRL7) (32 or
      64-bit).
    • Microsoft Online Services Module for Windows PowerShell (32 or 64-bit).

    Now launch the Microsoft Online Services Module for Windows PowerShell
    from your desktop or start menu and enter each of the following commands one at a time (each bullet
    point is one command NOTE that some commands may span more than one line due to web formatting – look for the actual BULLET POINTS to show you the beginning of each new command and copy it entirely).

    • $LiveCred = Get-Credential
    • $Session = New-PSSession -ConfigurationName Microsoft.Exchange
      -ConnectionUri https://ps.outlook.com/powershell/ -Credential
      $LiveCred -Authentication Basic -AllowRedirection
      • ENTER YOUR ADMIN USER CREDENTIALS (admin@xyz.microsoftonline.com &
        a password).
    • Import-PSSession $Session
    • Connect-MSOLService
      • ENTER YOUR ADMIN CREDENTIALS AGAIN
    • Get-MSOLUser | Set-MsolUser -PasswordNeverExpires $true

    And now you’re all set! Passwords won’t expire any more and passwords which have expired already will begin working again within minutes.

  • Re-Register all of the DLLs on your computer

    If you’ve recently had a virus or other random problems with your computer, such as the Blue Screen of Death, Windows Update not working, or Internet Explorer crashing, someone may have have advised that you use the System File Checker, or they may have told you to re-register all of the DLL’s on a computer. What the heck are they talking about?

    What they want you to do is to go through your computer with a fine-toothed comb and find any system files that may have been corrupted. That sounds like it could take hours and be extremely difficult, lucky for you: it isn’t!

    1. Open a command prompt (for most of you, you can simply click the Start Menu, then go to All Programs, Accessories, then click Command Prompt).
    2. Type the following, and press enter:
      sfc /scannow
    3. You can also use the switch (the part after the slash) “scanonce” to scan the computer when you reboot, or “scanboot” to ALWAYS check the computer on bootup, but I adise sticking with either scannow or scanboot.

    That doesn’t actually re-register all of the DLL files, however it does compare all of the major system files to what they should be based on a cached version or version from the base Windows install, and repair them if corrupted. To re-register DLLs takes a little longer, but it can solve a lot of problems when applications report that a file can’t be found or is missing. Open another command prompt and enter each command below one at a time, being sure to press enter after each one.

    In the example below, I point to System32. If you’re using a 64-bit computer, change directory to syswow64.

    cd
    cd windows
    cd system32
    for %1 in (*dll) do regsvr32 %1 /s
    for %1 in (*ocx) do regsvr32 %1 /s

    Now reboot your computer. This doesn’t check the files themselves, but it re-registers them in the system, so if, for example, two programs shared the same file, and you uninstalled one of the programs, it may have left the file behind but broken ‘links’ (so to speak) to the file, thereby breaking the second program. So, I encourage you to run this as a quick way to try and fix some problems you may be having with program crashes, Windows Blue Screens, RUNDLL errors, etc…

  • Cannot sign or encrypt this message certificate error when sending from Outlook solved!

    Ever see this when trying to send messages form your outlook?

    encryptedemailerror

    The error reads: “Microsoft Office Outlook cannot sign or encrypt the message because you have no certificate which can be used to send from the email address…”  Some people have even reported seeing the “Welcome to E-Mail Security” screen, which keeps asking them to “Get Digital ID.”

    First thing, if you haven’t made any changes to your Outlook Settings, you should report this to your IT department or tech consultant. It likely means that your email server’s SSL certificate has expired! But if you might have done some tinkering, you’re in luck, because this is a very simple fix. 

    It’s just a checkbox that you may have checked because you wanted your email to be safe. Unfortunately, you can’t just check the box (as easy as it looks) – it requires set up on the server to actually encrypt your mail, and for that to work, it needs a valid SSL security certificate. It could be that you do normally encrypt your messages, but your certificate has expired! In the mean time, here’s your workaround:

    The setting is called “Encrypt Contents and attachments for outgoing messages” and I have instructions below on how you find it.


    In Outlook 2007 and 2010:

    1. Click Tools.
    2. Click Trust Center.
    3. Click E-mail Security on the left.
    4. Uncheck the top box that says “Encrypt Contents and attachments for outgoing messages.”
    5. Click OK.

    You’re all set!  Now try sending another email, and the error should leave you alone.

  • How to create strong but easy to remember passwords

    Thursdays are the day of the week when I post some personal thought, but this week I’m thinking about passwords, so this will be a bonus “From the Help Desk” tip!

    Password policies get out of hand, sometimes. I understand the need to be secure, but I will never understand why we IT nerds make it so difficult for the rest of you. We require your password to be at least 8 characters long. It must meet 3 of the 4 following requirements: 1 (or more) upper case letter, 1 (or more) lower case letter, 1 (or more) special character, and 1 (or more) number. Oh, and it can’t be similar to any of your 25 previously used passwords. It can’t have more than 2 sequential letters or numbers (sorry, ghillieSuit123, you didn’t make the cut!), and if it includes an identifiable portion of your first or last name, it will be rejected. We also lock you out after multiple log-in attempts (to prevent others from “cracking” or “brute forcing” your password by going throug the dictionary one word at a time).

    Did you follow all of that? Me neither, and I’m one of those people responsible for making it all up. And that’s my problem with passwords. We make them so insanely complex that everyone needs to write down their passwords. Defeating the entire purpose of the password. Now, it’s true, people think mostly that a slip of paper in a desk drawer isn’t a huge security risk in this day and age. Computer crimes, password theft, etc… it all happens in the ether when groups hack large databases and steal hundreds of thousands of passwords at a time (as was the case very recently at my regional power company). But if you think that nobody would ever try to break in and steal your computer, you’re sadly mistaken. And some may go far enough to look for the passwords to go along with them. These things do still happen.

    Or, more likely, it could still just be as simple as a co-worker taking the information and impersonating you on the network and getting you fired. Anything can happen. We want your password to be secure, but I’m on your side: I hate that we make you change them so frequently. If we could trust you to just not give your password out, then you would have one password, and not have to write it down. It’s frustrating. But unfortunately, it doesn’t look like the “password policy” is going to change any time soon.

    So here’s what you can do about it. There are some simple services that will help you adhere to password policies in effect where you work. One will help you determine if your password is strong (or generate a strong password for you to use). That site is at HowStrongIsMyPassword.com. A more fun website to see if you’re really safe is HowSecureIsMyPassword.net. This website really entertains me. You can put in your real password and see how long it’s expected that a modern computer would take to crack your password. My “work” password, according to the website, would take 102 million years to “crack” if a hacker were to try some sequential combination of characters (example: a? ab? abc? a-z? ba? bb? bc? and so on, until all possible combinations of letters and numbers, symbols, and numbers are exhausted). While it’s an impressive number, it’s all for naught if somebody can just look on my desk and find my password on a post-it on my monitor.

    So just do your part to make your password fun. Most systems, like the computer in your typical office, will gladly accept characters such as spaces and even “!” exlamation marks. I encourage you to write a sentence with your password. Try it! It’s easier to remember, and harder to guess – even if someone knows you. For example, according to HowSecureIsMyPassword.net, it would take 62 sextillion years to crack your password if you made it something as simple to remember as “This is my password!” Another simple password to remember could be “I listened to 45’s growing up!” – not an easy thing to guess, and to crack, it could take 24 duodecillion years! So go on, try it!

    I would like to thank DarkMethod45 for sharing “How Secure…” link with me, and inspiring part of this article.

  • Resetting your TCP/IP Stack

    People have all kinds of nerdy reasons that they may need to reset their TCP/IP Stack. For me, I was unable o connect to Games for Windows Live. But if you ever find yourself offline and stranded with not internet connection except the browser on your smartphone, it may be a good idea to try resetting your TCP/IP stack!

    All of the nerds and geeks on the internet will just tell you that, matter-of-factly, without ever telling you how. Here are some very good basics that you can try to troubleshoot yourself, when you don’t have internet access, network connectivity isn’t working, or when some things work and somethings don’t. Why do these features get so messed up? The world may never know. But it’s good to know there’s a few things you can do to try and fix it, apart from rebooting your modem and router! 😉

    The following assumes you have at least local Administraor rights on your computer (most people do, to the distress of millions of IT folk).

    First: Reset WINSOCK:
    XP: Click Start, then Run, and type in CMD and press enter.
    Vista/7: Click Start, then type CMD (in the Search Programs an Files bar at the bottom) and press enter.

    This will bring up a familiar black Command Prompt Window. In there, type the following, and press enter:

    netsh winsock reset

    After rebooting the computer, see if that helped. No? Alright, that was just the WINSOCK portion of things, now let’s try resetting the whole TCP/IP stack.

    Open a command prompt, same as above. Then type the following as a single line:

    netsh int ip reset c:\resetstack.txt

    And, of course, reboot the computer. Did that help? If not, then at least you can say you’ve tried – but I was lucky and this resolved a very strange issue for me where literally everything else I was trying was working, except communicating with the Games for Windows Live service, which is why I have to give credit for the inspiration of this post to a user who calls himself “eastmanblues” on the Xbox Live forums.

  • Adding another user's mailbox in Outlook, using BPOS & Office 365

    This week’s post is another slightly more advanced one, so I apologize, but if you share this with your IT department, they’ll have no excuses! So you want full access to another user’s mailbox. It can be done, and has been done, with Exchange servers around the world. However if you need to do this in Microsoft’s Busness Productivity Online Suite (BPOS), then how in the world do you do it?

    It used to be you could go to your Exchange server, find the user who is going to share their info with another user, and give them Send-As or Full-Access permissions. But where is that option in BPOS? It’s nowhere, that’s the problem. But that doesn’t mean you can’t do it.

    First off, any user who is an Administrator in BPOS already has access to anybody’s mailbox under their domain. Meaning you can open up your Outlook client, go to your account settings, click Change, click More Settings, go to the Advanced Tab, then click ADD, and type a user’s name. It’s that easy.

    But I haven’t answered your question, yet. WHAT ABOUT BPOS? Here’s the scoop. I figured this one out a few days ago and have only tested it in Business Productivity Online Suite. However, a support rep from Microsoft has “confirmed” that these commands should work in Office 365. Your mileage may vary.

    Let’s say I have two users, Vera (vera@whutsit.com) and Dave (dave@whutsit.com). Vera needs full permissions to Dave’s email. She will be using the simple steps above to add Dave’s mailbox to her Outlook, however Vera is not a domain administrator, so a special permission will need to be created in the system. This is surprisingly easy to do.

    An Administrator must run command in the Migration Command Shell (which was set up, at some point, during your migration to BPOS).

    EXAMPLES

    Enter the following cmdlets as ONE SINGLE COMMAND (any line breaks are due to web-design):
    To GIVE Vera access to Dave’s mail:
    Add-MSOnlineMailPermission -Identity vera@whutsit.com -TrustedUser dave@whutsit.com -GrantFullAccess $True

    At some point down the road you may need to REVOKE that access:
    Remove-MSOnlineMailPermission -Identity vera@whutsit.com -TrustedUser dave@whutsit.com -RemoveFullAccess $True

    Note how the commands differe: the “Remove” not only at the beginning, but the end ofthe command, rather than “Add” and “Grant” respectively. I’m by no means an expert with this, but I certainly hope this helps someone out there!

  • In my router, what is WMM and should I enable it? Hint: yes!

    Update: More than 5 years after writing this, it’s still one of the most popular articles on my website, so I decided to make a short video that explains this as well! 😉


    Original post below:
    Fridays are usually video game related articles. Today, I’m not talking about games themselves, but how the gaming console has become the entertainment hub in your livingroom. It’s a lengthy post, but I think it will prove to be of some value to most readers! The long and short of it is: I was having major problems streaming Netflix to any of my wireless consoles – PS3, 360, or Wii. But my desktop computer worked fine. I enabled WMM and the majority of my problems were solved. It’s not a one touch fix, by any means – there are a million potential reasons video would be buffering, even times when the service you’re streaming from won’t have adequate bandwidth, are caught throttling your connection, or are being investigated for generally poor speeds. There are times when your regional ISP may just be having technical issues. There are an abundance of issues that can arise at the dozens of hops between you and the media you’re watching or listening to. But, in optimal conditions, WMM is a feature that will help you.

    There are debates galore concerning not only the effectiveness, but the legitimacy of “Wi-Fi Multimedia™ (WMM®) WMM® Quality of Service.” People don’t know what it is, don’t understand it, or don’t think it really does anything. Well, it’s my opinion and experience that it does make a difference for streaming movies, it’s worth noting, however that some people prefer to have this feature disabled, and doing so they claim faster overall throughput (faster “file” downloads). Personally, when I have WMM enabled, I do not see my regular download speeds slowed at all, and I enjoy the added benefit of buffer-free streaming to my Wi-Fi devices. Therefore, I’m going to explain not only why I think you should enable, but how to enable it.

    The rest of this article gets technical, and also may have instructions which you don’t need – the “meat” of the question is answered above

    .


    A little background on WMM

    Created by the Wi-Fi Alliance, a group of entities, including the manufacturers of wireless access points and networking hardware, WMM was designed to enhance the streaming of multimedia over wireless devices. From the technical side of things, despite drastic advancements in wireless technology, there will always be slightly higher latency in Wi-Fi devices than in wired connections. Trying to avoid all of the technical information, WMM allows traffic related to multi-media to take a higher priority, thus their packets get delivered first, meaning their “received!” packets will get back to the source sooner, meaning more packets will come your way sooner! “Net neutrality” goes out the Window… but only on your wireless network! In reality, if you enable WMM on your router, particularly in a home environment, it will not impact your other devices on the network, unless, say, you’re downloading and seeding a dozen torrents, streaming twenty movies, and making four VOIP calls at the same time!

    Services like Zune, Qriocity, Last.FM, YouTube, Netflix, and Vudu have capitalized on that, by making their software available on your home console. But do you ever have problems with your console, be it Xbox, PS3, Wii, or other Wi-Fi devices like your phone or tablet, buffering? If you try it on your wired computer or laptop or even on the same console, just wired directly to your router, you have no problem. But if you try to use Wi-Fi, whatever you’re watching or listening to simply keeps getting interrupted. It doesn’t make any sense: you know you have enough bandwidth, other devices work, why not this stupid console? Why is everyone enjoying Inside Xbox but you?

    Here’s what to do


    I’m not positive about the others, but I do know that on a LinkSys, WMM is Disabled by default – which is why I wanted to share this tip with everyone, because it actually made a difference for me! Open up your web browser, and go to the address: 192.168.1.1 (if it is different from this, you’re probably advanced enough to know how to find it, because you most likely changed it yourself!).

    Enter your router’s password. If you’ve never set it, there are several potential default passwords.

    What’s the default password for my router?

    • LinkSys / Cisco: username: {none} / password: admin
    • NetGear: username: admin / password: password or 1234
    • D-Link: username: admin / password: admin – in some cases, D-Link may have no name, or no password, or use user as the username.
    • For best results, a quick search on the web ought to point you in the right direction of finding your specific router’s password
    • .

    Once inside your router, you should be able to find an applications tab – in the case of the LinkSys WRT54G2 that we’re using in this example (an extremely common home router), it’s listed as Applications and Gaming. Here’s what it looks like for most LinkSys WRT54xx series routers:

    After you click the tab at the top, the subtabs will change. As you can see in the same picture above, there will be an option that says
    QoS. Click to the Quality of Service or QoS subtab.

    Scroll to the bottom of the page and change the drop down for WMM to Enabled.

    In a D-Link, you should go to the Advanced Tab, the Wireless Routing option on the left, then check the box to enable WMM.

    On a NetGear, look for the QoS Setup option, under the blue Advanced header on the left side of the page. Click on that, then check the box to Enable WMM and click the small Apply button at the bottom.

    *WHEW!!* Now that was an exhaustive post, but I hope it will get people thinking that they should give WMM a try, and help them ensure it’s enabled on their router!

  • How to Fix 0xc0000218 Registry Hive Error, or Boot.ini Missing Or Corrupt

    Today is a Tech Tip Two-for-one. 0xc0000218, or a missing Boot.ini file. If 0xc0000218 doesn’t apply to you, scroll past it to see how to fix a missing boot.ini or HAL.dll file. This advice from Help Desk is a little more on the advanced side, it’s not the kind of problem you’ll see every day. However, the errors you’ll see here are errors anybody can recover from. You know you’re in for a bad day when your computer won’t boot, but these tips out, they may get you back up and running. Since this article is for slightly more advanced users, I’m going to leave out some of the basics – when I say “Boot to the Recovery Console” I’m going to assume you know what that means. While these are errors that are easy to overcome, one misstep in this part of the computer can cause a world of trouble, so you still may want to rely on an experienced friend for assistance.

    0xc0000218

    I had a user who was getting a Blue Screen error on their Windows XP machine, right after or during bootup. It read:

    Stop: 0xc0000218 {Registry File Failure}
    The registry cannot load the hive (file):
    \SystemRoot\System32\Config\SYSTEM or its log or alternate.
    It is corrupt, absent, or not writable.

    To resolve this wasn’t too painful. If you perform a true Repair from a Windows XP disc, a lot of customization can be wiped out. Here’s what I did to just get back up and running, and not worry about my user profiles and everything else:

    NOTE: In the case of my example, the corrupted file was SYSTEM, but yours may indicate a problem with the SOFTWARE hive. If that’s the case, replace SYSTEM at the end of any line below with SOFTWARE. If you can do it from the Windows Advanced Startup Options even better, but you may have to boot from a Windows XP CD – but either way you want to get to the Recovery Console.

    I always type the following just to make sure I get back to the root of the C: drive, then in to the Windows directory. If you’ve installed Windows elsewhere, of course navigate to the proper directory, like WINNT.

    1. cd
    2. cd windows
    3. cd system32
    4. cd config
    5. rename system system.bak
    6. copy C:\windows\repair\system c:\windows\system32\config\system
    7. exit

    Let the computer reboot and see if your problem is resolved!

    If your computer reports that the Boot.ini file is missing or corrupt:

    1. Boot an XP CD
    2. select the recovery console
    3. Attrib -h -r -s C:\boot.ini
    4. del C:\boot.ini
    5. bootcfg /rebuild
    6. fixboot
    7. exit
    8. After the reboot, you should be able to get back in to Windows!

    I’ve been told that this works for the HAL.dll boot error as well, but I’m not certain, I’ve only ever used it for a boot.ini problem. It’s important to note that whether your have a problem with your registry hive or your boot.ini or whatever – you shouldn’t rely on these as “Fixes” to your problem. You certainly have a corrupt Windows installation and could even have a failing hard drive – you should back your data up immediately if either of these presented solutions lets you back in to your system.

  • Paid Apps in the Windows Phone 7 environment


    salepricingwrong


    You’re doing it wrong.  This has been an internet meme for a while, and applies directly to the problem with paid apps, in particular, those in the Windows Phone 7 Marketplace.  I’m hoping they don’t continue down this exact path when Windows 8 launches with its embedded app store.


    The problem isn’t that the Windows Phone 7 Marketplace has a larger ratio of “paid apps” to “free apps” than iTunes or the Android Market – the problems is what those apps are.  I don’t mind paying for apps, good apps in particular.  Use a pro version instead of a lite version, pay for the developer’s time.  Just imagine if they developed that app just for you, would you only feel compelled to give them a $1.99?  No!  It’s worth way more than that! You’re the one getting the bargain, so why not pay?  Particularly, when the app is “worth it.”


    What makes an App “worth it” is subjective.  Very subjective.  But I can tell you one of the things that, I feel, is not worth it, which is what I’m seeing a lot of in Windows Phone 7.  RSS Feeds.  If I want news from one of my favorite websites, I can go to that website and read it all day long.  As we all know, the overwhelming majority of sites on the internet are not behind pay walls.  This is the reality for content producers, and they’ve been struggling with ways to make money ever since.  With the new ecosystem of Windows Phone 7, came the chance to lay down the corrective law and start turning a profit for the hard work developing apps. But the problem isn’t going to be solved by charging a dollar for your app, which has the same content as your website.


    True, not every website is optimized for mobile browsing, and an app would be nice.  But let’s be frank, why would you spend a dollar to read something you have been and will continue to read for free?  There needs to be a proven value in your application, that goes above and beyond.  Exclusive articles are hard to sell, people get touchy and will leave your website because they think you’re holding out on them – even though they’re not paying a dime.  Still, perhaps the best solution might be offering some form of exclusive benefit, like industry interviews with people in your field, things that are going above and beyond that typical news articles.  If you can get those interviews.


    I don’t have the perfect solution, but I do have good news.  From what I’ve seen, again, in particular on the WP7 Marketplace, it looks like a lot of the people trying to charge for what is little more than an RSS feed, are just people trying to make a buck off of others’ hard work.  The developer is usually not affiliated with the actual website at all, and just popped and RSS feed reading app together with the RSS feed of a popular website, and is trying to pass it off as an app.  I imagine many people are not getting suckered and I hope few are being sold, especially in cases like this.  But that doesn’t mean I don’t want to see developers actually concentrate on making better decisions when they do decide to put their content on a mobile platform.  Ad-Supported apps don’t bother me a bit, but when I do pay for an app, I expect at least something out of it, more than just saving me the time of typing a URL – and the good news is, I think the people managing their own brands and websites know that.

  • Android Unable to Mount SD Card solved!

    This isn’t quite my normal “From the Help Desk” kind of tip for a tech-tip-Tuesday, but I ran in to it last week and thought you might want to know about it.

    I recently received an error from my Android, after a reboot, that it was unable to mount my SD Card, and suggested that it may need formatting. Bad sign. I wasn’t about to Format my SD Card and lose everything to “fix” the issue. I would have to reinstall a ton of apps, I would lose photos, music, and other documents on the card… no, I wasn’t going to have any part of this.

    I removed and reinserted the card several times, rebooted the phone multiple times: nothing worked. Finally I inserted the card in to my laptop’s SD Card reader, and even then I was greeted with the same error message, that I would need to format the disk. Again, no thanks. So here’s all I had to do:

    Before continuing: it is possible that this process will not fix your card, it may be beyond normal repair, but this is just a suggestion that was able to get me back in business. Something is corrupt that is causing this issue, and there may be some applications or data on the card that is corrupted during the “repair” process, you may lose some data in thies proess. Again, although typically minimal if at all, this “fix” can result in data loss. Also, this is likely not a PERMANENT solution for you – the card is probably beginning to go bad and should be replaced as soon as possible.

    With the card inserted in to the computer, it should be assigned a drive letter (for example, “E:“). If you’re in the “Computer” (Windows 7) or “My Computer” (Windows XP) screen, you’ll see the drive listed, with a letter, but if you double click on it, it will prompt you to format the sd card. DO NOT format the card.

    1) Open a command prompt:
    Windows 7: Start > search for CMD > click the program listed as CMD with the little black icon
    or
    Windows XP: Start > Run > cmd > OK (or enter)

    2) In the command prompt that appears type the following (note, in my example, my SD Card was given the drive letter of E: – but replace the E: with whatever letter your card has been assigned in My Computer):
    chkdsk E: /f /r
    Then press ENTER.

    You will see the computer run a checkdisk process on the sd card. It will repair whatever is wrong with the filesystem and you’ll most likely be able to use the card in your phone again. But do not ignore this warning – the card is clearly beginning to fail and you should move important data off of it and REPLACE the card entirely as soon as possible, copying all of your data to a new card!

    If you don’t have an SD Card Adapter like the one pictured above, or any other way to connect your SD Card to your computer, I do not know of any way to perform this process while the card is still inside your phone, sorry.

  • Internet Explorer keeps crashing on Microsoft Websites

    Whether I try to use Bing.com, Xbox.com, or several other legitimate websites, I keep having problems with Internet Explorer crashing out. I’m sure I have my Windows Updates, so what is going on?

    I had this problem on my work computer just a few months ago. And even though I was certain I had my updates, and had even went from IE8 to IE9 trying to resolve the issue, I still had problems with my browser crashing on many of Microsoft’s own websites. Why? Simple.

    I was missing Silverlight. Trust me, I genuinely thought I already had it installed, but until I went to the Silverlight website and installed it, my problems continued. Silverlight was and is Microsoft’s tool to compete with Flash. HTML5 really seems to be taking over, and will continue to grow as the HTML standard improves. Upgrading to Internet Explorer 9 seemed to resolve my issues with Bing, but I still couldn’t use Xbox.com to save my life. I realized that despite my having been through the Windows Update process about a million times, I had missed something and simply needed to install Silverlight. A few short seconds later and all of my brower crashing problems were solved!

    Why didn’t you have the problem all the time? Also an easy answer: Silverlight isn’t as ubiquitous as flash – so I only really noticed a problem on sites that used it the most. Where would you find those? Microsoft’s own sites, of course! Installing the Silverlight plugin resolved my issues, and I hope it fixes yours!

  • There was a problem sending the command to the program – Excel

    I deal with this one, time and time again, within the Help Desk. What causes it to trigger, I’m not certain. But one day, when trying to open Excel 2007 XLS documents, I come to the error message that says “There was a problem sending the command to the program.” If this happens to you, the solution is typically quick and easy. I have yet to see it in Excel 2010, but the solution is most likely the same. When greeted with “There was a problem sending the command to the program here’s what you do:

    • Click on the Office Button (in the upper left, where the File Menu was in Office XP and is in Office 2010).
    • Click Excel Options at the bottom.
    • Click Advanced on the left.
    • Scroll all the way down and look for the longest option, named “Ignore other applications that use Dynamic Data Exchange (DDE).”
    • UNCHECK that box.

    That’s it! Exit Excel 2007 and test it! This should be the solution to your error “problem sending the command” error.

  • My Printer Stopped Working, now what?

    Update: If you’ve already tried everything below, see the sequel to this article!

    Tales from the Help Desk?  It’s time for another Tech Tip Tuesday!

    Ever hear of someone taking a few seconds to “reset the print spooler” and their computer magically started working for them?  Sometimes it really is that easy.  Resetting the print spooler takes about 10 seconds and is far more efficient than rebooting your whole computer.  So if you’re asking how do I restart the print spooler?  There are several ways.


    If you’re familiar with the Command Prompt you can simply load one up and type in the following two commands:

    net stop spooler

    net start spooler

    command_prompt_spooler


    You’re done!  Your printer should start spitting out pages again.


    If the command prompt feels just a little overwhelming for you, don’t worry – there’s an easier point and click way to do it.  If you’re in Windows XP, click on Start then Run, type the word “Services” and press Enter or click OK.  In Windows 7, click on the start menu and “search” for the Services console.


    startmenusearch_services


    Once the Services console is loaded up, scroll through the big long list.  Don’t let the quantity scare you, you’re just looking for the Print Spooler Service.  Once you find it, RIGHT CLICK on it, then click RESTART from the right click menu.  A progress bar will pop up for a few seconds saying that it is stopping, then another will pop up saying it is starting.  And you’re done!


    restart_print_spooler


    One more method for getting to the “Services” console that works in Windows XP / Vista / 7 – Right Click on the My Computer or Computer icon, then click Manage from the right click menu.  Then, on the left side, click Services.  You can memorize this process, then no matter what computer you find yourself working on, you can most likely find the quickest way to reset the print spooler.

  • How do I stop Word 2007 / 2010 from Double Spacing?

    It’s Tech Tip Tuesday, AKA Tips from the Help Desk!  Another Word-related tip for you today, because here in the Help Desk, we se calls all the time about our favorite Office products.


    wordstylesheet


    In Word 2007, Microsoft changed the formatting to what they consider an easier to read double-spaced format.  They also changed the font to one that, as I understand it, is a little “greener” – as in, when it prints, the the letters are a little thinner meaning they use less ink.  All of these little changes have frustrated people to no end, since it had been previously unchanged since Office ‘97.  So how do you get back to the old format?  It’s easy.


    Simply Open Microsoft Word, then on the right hand side click on Change Styles, choose Style Set, then select Word 2003 from the bottom of the list.  And just like that, you’re back to the old Single Spaced format, and if you want, you can even change back to Times New Roman font.  If you want it to be like this every time you open up Office from now on, just click the Change Styles button again and choose Set as Default.


    There is another way to adjust the spacing (under the Home tab in the Ribbon menu at the top of the screen, click the Line Spacing button in the Paragraph group).  But I have actually found this not to work as well as simply changing the default style sheet.


    One more tip: if you’re okay with the default Word 2007/2010 layout, but you would like the ability to just insert a single space every now and then, instead of being forced to always use a double space, you can simply hold the SHIFT key while you press the ENTER key.  This will bring you to the line immediately beneath where you are and might look a little better on certain occasions.


    Now go forth and be productive!

  • Change Default Word 2007 2010 DOCX icon

    docx

    Updated based on user feedback:

    Ever see the icon above and asked “Help, my default DOCX icon has changed to something ugly! How do I solve this?”  If not, you’ve had good luck so far.  But some day you might, so commit this one to memory.

    I had to deal with this issue on my girlfriend’s laptop just last month.  The DOCX icon had been replaced with this ugly icon.  Something had gone wrong with the file association, as well, but I had fixed that – still, the icon stayed.  I tried to edit literally DOZENS of Registry Keys, DWord Values, and expanding size entries…  I added things to my registry that weren’t there, changed the ones that were there, and rebooted dozens of times.  What finally fixed it?  Frustratingly simple.

    Change the file association for .DOCX files to open with WordPad instead of MSWord (that’s where the ugly icon came from) – then set it back to MSWord.  Here’s how to do it:

    docx_openwith


    1. Right click the file, mouse over the “Open With” option at the bottom of the list of programs, click “Choose Default Program.”
    2. Select “WordPad” and hit OK.
    3. Once applied, open the menu back up, and now double click the Microsoft Office Word icon. The file should open with Word, then when you close it you’ll see the icon!

    Hope this helps someone out there, some day!

  • Where Microsoft's "to the cloud" ads fall short

    I think most people get that I’m a Microsoft Fan-Boy. A self-admitted Windows lover, Xbox lover, Windows Mobile addict, Microsoft product junkie. That’s why I don’t like being critical of Microsoft, but they just keep missing the point.

    Android, and specifically even Motorola Droid commercials, often advertise how Product X is “just one of thousands of apps” available on the Droid. They plug the product, tell you what it does, all kinds of great things – and this is putting money in someone else’s pocket (though I’m sure some sort of scheme was worked out to get a product promoted).

    Meanwhile, Microsoft gives all the glorty to “the cloud” – without ever telling you what it is, how it works, or how to actually use it.


    Get Microsoft Silverlight

    Now, I know the concept of the cloud is still a bit abstract for many home PC users, but when Microsoft shows off some great video conferencing software, it sure would be nice if I knew the name of it so that I could start video conferencing with my parents (note: I, frankly, still have no idea what cloud-product is being featured in this ad – can Live Messenger share a video while 2 people video chat?). I just think that the ads should at least feature the name of the Windows application that actually lets you do these things. It’s out there, it’s self promotional, it’s easy. Why is it so hard for Microsoft advertising partners to figure out?